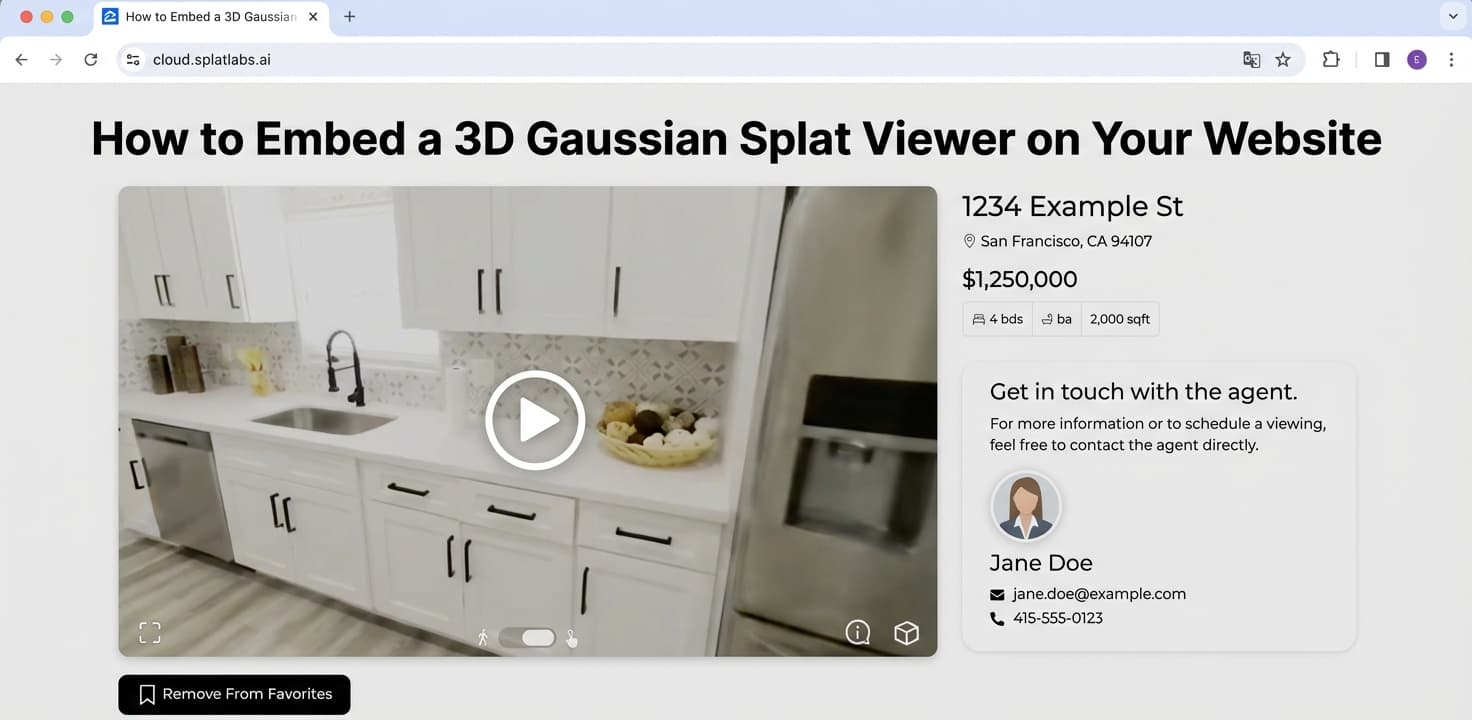
Why Embed a 3D Gaussian Splat?
Static images and even 360-degree photos can only show so much. A Gaussian Splat embed gives your website visitors the ability to walk through a fully photorealistic 3D scene — rotating, zooming, and exploring from any angle — all without installing a single app.
Whether you are a real estate agent showcasing a listing, a construction firm sharing site progress with stakeholders, or a creative studio building an interactive portfolio, embedding a Gaussian Splat viewer turns passive viewers into active explorers.
With Splat Labs Cloud, embedding is as simple as copying a single line of HTML.
How It Works
Every project you upload to Splat Labs Cloud gets a shareable viewer URL. That URL can be opened directly in a browser, or wrapped in an HTML <iframe> tag to embed it inside any webpage — your own site, a blog, a Zillow listing, an MLS page, a Notion doc, or a CMS like WordPress, Squarespace, or Webflow.
Here is the process:
Step 1: Open the Share Dialog
After uploading and processing your Gaussian Splat on Splat Labs Cloud, open your project. On the left side of the viewer, you will see a sidebar drawer. At the bottom of that sidebar, click the Share button.
This opens the Sharing dialog, where you can control access settings and get your embed code.
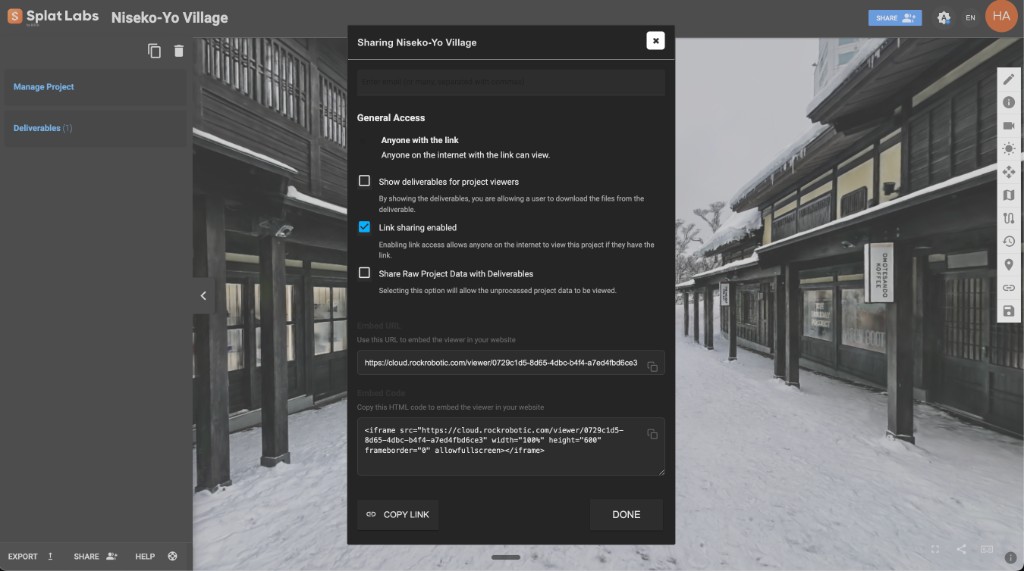
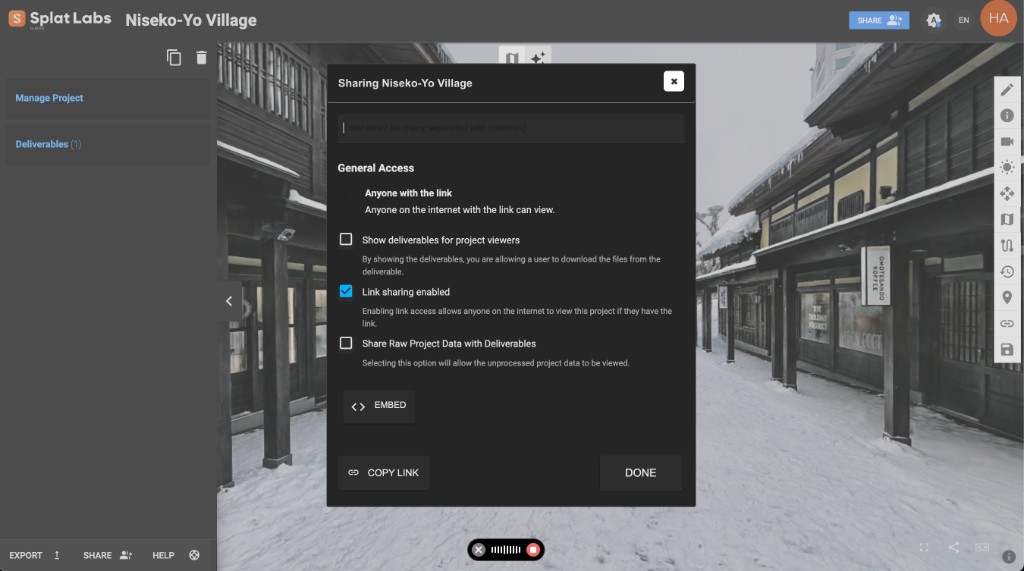 The Splat Labs sharing dialog. Make sure "Link sharing enabled" is checked, then click the EMBED button to get your iframe code.
Step 2: Get Your Embed URL or Code
In the sharing dialog:
- Make sure "Link sharing enabled" is checked — this allows anyone with the link to view your project.
- Click the EMBED button to expand the embed section.
You will now see two fields:
- Embed URL — The viewer URL you can use directly or paste into platforms like Zillow, Notion, or MLS.
- Embed Code — A ready-made HTML
<iframe>snippet you can copy and paste straight into your website.
 After clicking EMBED, the dialog shows your Embed URL and the full HTML embed code — just click the copy icon next to either field.
Both fields have a copy icon on the right side. Click it to copy the value to your clipboard.
This URL loads an interactive 3D viewer that works in any modern browser — desktop, tablet, or mobile.
Step 3: Paste the Embed Code
Take the embed code (or wrap the viewer URL in a standard HTML <iframe> tag) and drop it into your website's HTML:
<iframe
  src="https://cloud.splatlabs.ai/viewer/{project-id}?view=splat"
  width="100%"
  height="600"
  frameborder="0"
  allowfullscreen
  loading="eager">
</iframe>
That is it. Your visitors can now explore the full 3D scene without leaving your page.
Pro tip: Set
width="100%"so the viewer stretches to fill its container on any screen size. Adjustheightto suit your layout — 500–700 pixels works well for most designs.
Live Examples
Below are two Gaussian Splat scenes hosted on Splat Labs Cloud. Interact with them right here — click and drag to orbit, scroll to zoom, and explore every angle. These embeds are free to use on your own website. Feel free to copy the embed code below each viewer and paste it into your site. The shared viewer includes the Splat Labs watermark.
Example 1: Construction Site
A multi-week construction site captured with LiDAR and processed as a Gaussian Splat. This is the kind of embed that construction teams share with remote stakeholders so they can explore the jobsite without traveling.
Embed URL:
https://cloud.splatlabs.ai/viewer/e6d9b3eb-35bb-4a73-8499-8f2e3ad21d4b?view=splat
Embed Code (copy & paste):
<iframe
  src="https://cloud.splatlabs.ai/viewer/e6d9b3eb-35bb-4a73-8499-8f2e3ad21d4b?view=splat"
  width="100%"
  height="600"
  frameborder="0"
  allowfullscreen
  loading="eager">
</iframe>
Example 2: Niseko Village — Snowy Ski Resort
A photorealistic capture of a snowy ski resort village in Niseko, Japan. This kind of immersive embed is perfect for tourism, hospitality, and destination marketing — letting potential visitors explore a location before they book.
Embed URL:
https://cloud.splatlabs.ai/viewer/0729c1d5-8d65-4dbc-b4f4-a7ed4fbd6ce3
Embed Code (copy & paste):
<iframe
  src="https://cloud.splatlabs.ai/viewer/0729c1d5-8d65-4dbc-b4f4-a7ed4fbd6ce3"
  width="100%"
  height="600"
  frameborder="0"
  allowfullscreen
  loading="eager">
</iframe>
Customizing Your Embed
Responsive Height
For a responsive embed that maintains a 16:9 aspect ratio on any screen, wrap your iframe in a container:
<div style="position: relative; padding-bottom: 56.25%; height: 0; overflow: hidden;">
  <iframe
    src="https://cloud.splatlabs.ai/viewer/{project-id}?view=splat"
    style="position: absolute; top: 0; left: 0; width: 100%; height: 100%;"
    frameborder="0"
    allowfullscreen
    loading="eager">
  </iframe>
</div>
This technique — sometimes called the aspect-ratio box — is widely used for video and map embeds. It ensures your viewer looks great on everything from a 4K monitor to a mobile phone.
Full-Width Embed
Want the viewer to break out of your content column and span the full width of the browser? Use this wrapper:
<div style="position: relative; width: 100vw; left: 50%; margin-left: -50vw;">
  <iframe
    src="https://cloud.splatlabs.ai/viewer/{project-id}?view=splat"
    width="100%"
    height="600"
    frameborder="0"
    allowfullscreen
    loading="eager">
  </iframe>
</div>
Loading Behavior
loading="eager"— The viewer starts loading immediately when the page loads. Best when the embed is above the fold or is the main content.loading="lazy"— The viewer only loads when the user scrolls it into view. Best for pages with multiple embeds or when the viewer is further down the page.
Platform-by-Platform Embedding Guide
The Splat Labs viewer works anywhere that supports HTML or iframes. Below is a detailed walkthrough for every major platform.
WordPress
WordPress offers several ways to embed an iframe, depending on whether you are using the Block Editor (Gutenberg) or the Classic Editor.
Block Editor (Gutenberg) — recommended:
- Open the page or post where you want to embed the viewer.
- Click the + block inserter and search for Custom HTML.
- Add the Custom HTML block to the page.
- Paste the full iframe embed code into the block.
- Click Preview to confirm it renders correctly, then publish.
Classic Editor:
- Open your page or post and switch to the Text tab (not Visual).
- Paste the iframe embed code directly where you want it to appear.
- Switch back to the Visual tab to preview, then publish.
Using a plugin (optional):
If you embed iframes frequently, the iFrame plugin (available on WordPress.org with 70,000+ active installs) lets you use a simple shortcode instead of raw HTML:
[iframe src="https://cloud.splatlabs.ai/viewer/{project-id}?view=splat" width="100%" height="600"]
This works in both the Block Editor and Classic Editor without needing to switch to HTML view.
Elementor / other page builders:
Most page builders like Elementor, Divi, and Beaver Builder include an HTML or Code block. Drop that block onto your page and paste the iframe code.
Troubleshooting: If the embed shows a blank space, make sure both your WordPress site and the Splat Labs viewer are served over HTTPS. Mixed-content (HTTP iframe on an HTTPS page) is blocked by modern browsers. Splat Labs Cloud always uses HTTPS, so this should not be an issue. If you are on a WordPress Multisite setup, confirm that unfiltered HTML is enabled for your user role.
Squarespace
Squarespace supports iframes through Code Blocks, but there is an important plan requirement to be aware of.
Plan requirement: Adding JavaScript or iframes to Code Blocks requires Business, Commerce Basic, Commerce Advanced, Core, Plus, or Advanced plans. The Personal plan only supports plain HTML, Markdown, and CSS in Code Blocks — iframes will not render.
How to embed:
- Open the page editor in Squarespace.
- Click an insert point (the line between content sections) or click Add Block.
- Select Code from the block menu.
- Paste the full iframe embed code into the Code Block editor.
- Click outside the block to save. The embed should appear in the editor.
If the embed does not appear while editing: This is expected behavior. Squarespace sometimes hides iframe content when you are logged in as a security measure. Click Preview or view your published site in an incognito window to confirm the embed is rendering correctly for visitors.
Using an Embed Block instead of a Code Block:
Squarespace also has a separate Embed Block that accepts URLs from oEmbed-compatible services. Since Splat Labs Cloud is not an oEmbed provider, you should use the Code Block method described above — not the Embed Block. If you try the Embed Block and paste the raw URL, Squarespace may fail to detect it or display a "not supported" error.
Making it responsive:
Squarespace's content columns have a fixed max-width. To make the iframe fill the full column width, use width="100%" in your iframe code. For responsive height, wrap the iframe in the aspect-ratio container shown in the Customizing Your Embed section above.
Tip: If you are on a Squarespace Personal plan and cannot use Code Blocks with iframes, consider upgrading to the Business plan — or link directly to your Splat Labs viewer URL as a standard hyperlink so visitors can open it in a new tab.
Webflow
Webflow treats custom code as a first-class design element through its Embed element (also called Code Embed).
How to embed:
- Open the Webflow Designer for your project.
- Open the Add panel (the + icon on the left sidebar).
- Search for or scroll to Embed (under the Components section) and drag it onto the canvas where you want the viewer to appear.
- The code editor opens automatically — paste the full iframe embed code.
- Click Save & Close.
The iframe will preview directly on the Webflow canvas. Content wrapped in <iframe> tags renders a live preview in the Designer, so you should see the Splat Labs viewer immediately.
Plan requirement: The Embed element is available on all Webflow Workspace plans (Core, Growth, Agency, Freelancer) and any site with an active Site plan. Free staging sites can also use it.
Sizing and responsiveness:
If the iframe does not explicitly set sizing, it will take the full width of its parent element. You can control the width and height of the Embed element from Webflow's Style panel just like any other element. For responsive behavior, set the element's width to 100% and use a fixed height, or wrap it in a div with the padding-bottom aspect-ratio technique.
Embedding inside CMS Collection items:
If you want to embed a different Splat Labs viewer on each CMS Collection page (for example, a portfolio of 3D scans), you can store the viewer URL in a CMS text field and reference it dynamically within an Embed element using Webflow's CMS field binding. Add an Embed element to your Collection Template, then insert the CMS field reference inside your iframe src attribute.
Character limit: Embed elements have a 50,000-character limit. A single Splat Labs iframe is well under this, so this should never be an issue.
Note: Webflow's custom code support documentation explicitly states that custom code may conflict with Webflow's underlying functionality and that their support team cannot help debug custom code. That said, a simple iframe like the Splat Labs viewer should work without any issues.
Wix
Wix provides a dedicated HTML iFrame element for embedding external content.
Wix Editor — how to embed:
- In the Wix Editor, click the + (Add) button on the left sidebar.
- Navigate to Embed Code → Embed HTML.
- A gray box appears on your page — drag it to your preferred position and resize it as needed.
- Click the element, then click Enter Code.
- Select Code (not Website Address).
- Paste the full iframe embed code into the text box.
- Click Update (or Apply).
Wix Studio Editor:
- Click Add Elements on the left side of the editor.
- Click Embed & Social.
- Select Embed Code to add the element to the page.
- Click Enter Code, paste the iframe code, and click Apply.
Embedding via URL (alternative method):
Instead of pasting iframe code, you can paste the viewer URL directly:
- Add an Embed element as described above.
- Instead of selecting Code, select Website Address.
- Paste the Splat Labs viewer URL:
https://cloud.splatlabs.ai/viewer/{project-id}?view=splat - Click Apply.
This method is simpler but gives you less control over sizing attributes.
Important notes for Wix:
- The embed URL must use HTTPS. Splat Labs Cloud always serves over HTTPS, so this is already handled.
- The HTML iFrame element in Wix is sandboxed — it creates an isolated iframe environment. This means the viewer operates independently of your page styles, which is ideal for a 3D viewer.
- Wix's iFrame element is not inherently responsive. Even if your viewer URL is responsive, the Wix iframe container has a fixed size on the canvas. Set width and height in your iframe code to
100%and manually size the Wix embed container for both desktop and mobile layouts. - Mobile: The desktop iframe element does not automatically translate to mobile. In the Wix mobile editor, you may need to add a separate Embed HTML element positioned and sized specifically for mobile screens, or hide the desktop element and add a mobile-friendly alternative.
Premium requirement: Wix supports HTML iFrame embeds on free and premium plans in the standard editor. However, if you use Custom Elements (advanced Velo/Blocks integrations), a premium plan with a connected domain is required.
Notion
Notion does not accept raw HTML or <iframe> code. Instead, you embed content by pasting a URL into an Embed block, and Notion handles the iframe rendering behind the scenes.
How to embed:
- Open the Notion page where you want the viewer.
- Type
/embedon a new line, or click the + button and select Embed. - Paste the Splat Labs viewer URL (not the iframe code — just the URL):
https://cloud.splatlabs.ai/viewer/{project-id}?view=splat - Click Embed link.
Notion will render the viewer in an inline frame. You can resize it by hovering over the block and dragging the handles on either side.
Important: Use the URL, not the iframe code. Notion's embed block expects a clean https:// URL. If you paste the full <iframe> HTML tag, it will not work. Notion uses the Iframely service to resolve embed URLs from over 1,900 domains.
If the embed does not load:
- Make sure the Splat Labs viewer URL is publicly accessible (it should be — shared viewer links are public by default).
- If Notion shows a bookmark card instead of an embed, delete the bookmark and try again using the
/embedcommand explicitly. - Some workspaces with strict security settings may limit external embeds. Check with your workspace admin if you are on an Enterprise plan.
Sizing: You can resize the embed width by dragging the handles. For more vertical space, you may also want to set your Notion page to Full Width mode (click the ⋯ menu at the top right → toggle Full Width).
Tip: Notion embeds are great for internal project documentation. Share a Gaussian Splat capture of a construction site, a scanned building, or a terrain model directly inside your project wiki so your team can explore it without leaving Notion.
Zillow / MLS Listings
Zillow and most MLS platforms support virtual tour links, but they work differently from standard iframe embeds. You do not paste iframe code directly — instead, you provide the viewer URL in a dedicated field.
How to add to Zillow:
- Log in to your Zillow agent account at zillow.com.
- Navigate to your Listings dashboard and select the property.
- Click Edit listing.
- Scroll down to the Photos section — below it, you will find a field labeled Virtual Tour URL.
- Paste the Splat Labs viewer URL:
https://cloud.splatlabs.ai/viewer/{project-id}?view=splat - Scroll to the bottom and click Update to save.
Zillow will add a "View Virtual Tour" button to your listing page. Visitors click it to open the 3D viewer.
How to add to your MLS:
Most MLS systems (Flexmls, Matrix, Bright MLS, etc.) have a Virtual Tour URL field on the listing edit page. Paste the Splat Labs viewer URL there. Once synced, the tour link will automatically syndicate to Zillow, Trulia, Realtor.com, Redfin, and other portals that pull from your MLS feed.
Important notes:
- Zillow displays third-party virtual tours as a hyperlink in the Facts and Features section of the listing page. For more prominent placement (appearing in the photo carousel), Zillow currently favors tours from a select list of approved providers (Matterport, iGuide, etc.) and its own Zillow 3D Home app.
- The MLS is the authoritative source. If you add the virtual tour URL to your MLS listing, it will automatically appear on Zillow when the listing syndicates — you do not need to add it in both places.
- Both branded and unbranded tour links may be supported depending on your MLS. Check your MLS documentation for details.
Embedding on your own real estate website:
For your personal agent website or brokerage site, use the standard iframe embed code to display the 3D viewer inline on your listing pages. This gives buyers a far richer experience than a simple link.
Real estate professionals: Listings with virtual tours receive significantly more views. Zillow reports that listings with 3D tours get up to 68% more views than those without. Embedding a Gaussian Splat walkthrough lets buyers explore every angle of a property — 24/7, from anywhere.
GitHub Pages
GitHub Pages sites are static HTML, so embedding an iframe is straightforward — paste the code directly into your HTML or Markdown files.
In an HTML file:
Paste the iframe embed code anywhere in your page's <body>:
<iframe
  src="https://cloud.splatlabs.ai/viewer/{project-id}?view=splat"
  width="100%"
  height="600"
  frameborder="0"
  allowfullscreen
  loading="eager">
</iframe>
In a Markdown file (with Jekyll):
GitHub Pages uses Jekyll by default, and Jekyll's Markdown renderer (Kramdown) supports inline HTML. You can paste the iframe directly into your .md file and it will render when the site is built:
Here is an interactive 3D scan of the site:

<iframe
  src="https://cloud.splatlabs.ai/viewer/{project-id}?view=splat"
  width="100%"
  height="600"
  frameborder="0"
  allowfullscreen
  loading="eager">
</iframe>
Note about GitHub README files: If you are trying to embed in a README.md on a GitHub repository page (not a GitHub Pages site), iframes will not render. GitHub's Markdown sanitizer strips <iframe> tags from README files for security reasons. For repository READMEs, link to the viewer URL instead or use a screenshot with a clickable link:
[](https://cloud.splatlabs.ai/viewer/{project-id}?view=splat)
React / Next.js
In React and Next.js projects, use the iframe directly in your JSX. The HTML <iframe> tag works natively — just note the JSX attribute naming differences.
Basic React component:
export default function SplatViewer({ projectId }) {
  return (
    <iframe
      src={`https://cloud.splatlabs.ai/viewer/${projectId}?view=splat`}
      width="100%"
      height="600"
      frameBorder="0"
      allowFullScreen
      loading="eager"
      style={{ border: 'none' }}
    />
  );
}
Key JSX differences from HTML:
frameborder→frameBorder(camelCase)allowfullscreen→allowFullScreen(camelCase)- Use
style={{ border: 'none' }}instead offrameborder="0"for stricter React compliance
Responsive wrapper component:
export default function ResponsiveSplatViewer({ projectId }) {
  return (
    <div style={{
      position: 'relative',
      paddingBottom: '56.25%',
      height: 0,
      overflow: 'hidden'
    }}>
      <iframe
        src={`https://cloud.splatlabs.ai/viewer/${projectId}?view=splat`}
        style={{
          position: 'absolute',
          top: 0,
          left: 0,
          width: '100%',
          height: '100%',
          border: 'none'
        }}
        allowFullScreen
        loading="eager"
      />
    </div>
  );
}
Next.js considerations:
- The iframe loads client-side content, so it works fine in both Server Components and Client Components.
- For performance, consider using
loading="lazy"if the viewer is below the fold. - If you need to defer iframe loading until it scrolls into view, wrap the component in React
Suspenseor use the Intersection Observer API for more precise lazy-loading control. - Add the
sandboxattribute if you want to restrict iframe capabilities for tighter security:sandbox="allow-scripts allow-same-origin".
Hugo / Gatsby / Astro / Other Static Site Generators
Any static site generator that outputs HTML supports iframes natively. Paste the embed code into your page template, content file, or component.
Hugo:
In your Markdown content file, paste the iframe directly — Hugo's default Markdown renderer (Goldmark) supports inline HTML:
{{< rawhtml >}}
<iframe
  src="https://cloud.splatlabs.ai/viewer/{project-id}?view=splat"
  width="100%"
  height="600"
  frameborder="0"
  allowfullscreen
  loading="eager">
</iframe>
{{< /rawhtml >}}
If you do not have a rawhtml shortcode, create one at layouts/shortcodes/rawhtml.html with the content: {{ .Inner }}
Alternatively, enable unsafe HTML rendering in your Hugo config:
[markup.goldmark.renderer]
  unsafe = true
Then paste the iframe directly into any .md file.
Gatsby:
Use the iframe in any React component or page, just as described in the React / Next.js section above.
Astro:
Paste the iframe directly into any .astro component or Markdown file. Astro supports raw HTML in Markdown by default.
Shopify
Shopify supports custom HTML in several places across your store.
In a page or blog post:
- Open the page or blog post in the Shopify admin.
- In the rich text editor, click the <> (Show HTML) button to switch to HTML view.
- Paste the iframe embed code.
- Switch back to the visual editor to confirm placement, then save.
In a Liquid theme template:
Paste the iframe code directly into any .liquid file in your theme (for example, in a custom section or page template).
In a Custom Liquid section (Online Store 2.0):
- Go to Online Store → Themes → Customize.
- Add a Custom Liquid section.
- Paste the iframe embed code into the Liquid field.
- Save.
Custom HTML / Any Website
If you have direct access to your website's HTML source files, embedding is as simple as pasting the iframe code into the <body> of any page:
<iframe
  src="https://cloud.splatlabs.ai/viewer/{project-id}?view=splat"
  width="100%"
  height="600"
  frameborder="0"
  allowfullscreen
  loading="eager">
</iframe>
This works on any static HTML site, any server-rendered site (PHP, Python, Ruby, etc.), and any CMS that lets you edit the page source directly.
Frequently Asked Questions
Is it free to embed?
Yes. Every Splat Labs project can be shared and embedded at no additional cost. Shared embeds display the Splat Labs watermark. Business and Enterprise plans offer reduced or white-label branding.
Do my visitors need to install anything?
No. The viewer runs entirely in the browser using WebGL. It works on Chrome, Safari, Firefox, and Edge — on desktop, tablet, and mobile.
Can I control the initial camera position?
Yes. Set up your preferred camera angle in the Splat Labs viewer before sharing. The embed will load at that exact position.
Does the embed affect my page speed?
The iframe loads independently from your page content. Using loading="lazy" ensures the viewer only loads when scrolled into view, so it has minimal impact on your initial page load time.
Can I embed on multiple pages?
Absolutely. There is no limit to how many pages can embed the same viewer. The viewer is served from the Splat Labs CDN, so it loads fast everywhere.
Why does the embed show a blank space?
The most common causes are mixed-content blocking (HTTP page loading HTTPS iframe or vice versa) and the source site blocking iframes via X-Frame-Options or Content-Security-Policy headers. Splat Labs Cloud serves all viewer URLs over HTTPS and allows iframe embedding by default, so if you see a blank space, check that your own site is also served over HTTPS.
Can I customize the viewer branding?
Free shared links include the Splat Labs watermark. Business and Enterprise plans offer white-label options where you can remove or replace branding with your own logo.
Ready to Embed Your Own?
Creating and embedding a Gaussian Splat viewer takes just a few minutes:
- Sign up free at cloud.splatlabs.ai
- Upload your Gaussian Splat file (PLY, SPLAT, KSPLAT, or XGRIDS format)
- Click Share and copy the embed URL or iframe code
- Paste into your website, blog, or listing platform
Splat Labs supports Gaussian Splats from any source — PortalCam, Lixel L2 Pro, Postshot, Kiri Engine, Luma AI, XGRIDS, or any other tool that outputs standard splat formats.
Need help embedding on a specific platform? Contact our team — we are happy to walk you through it.