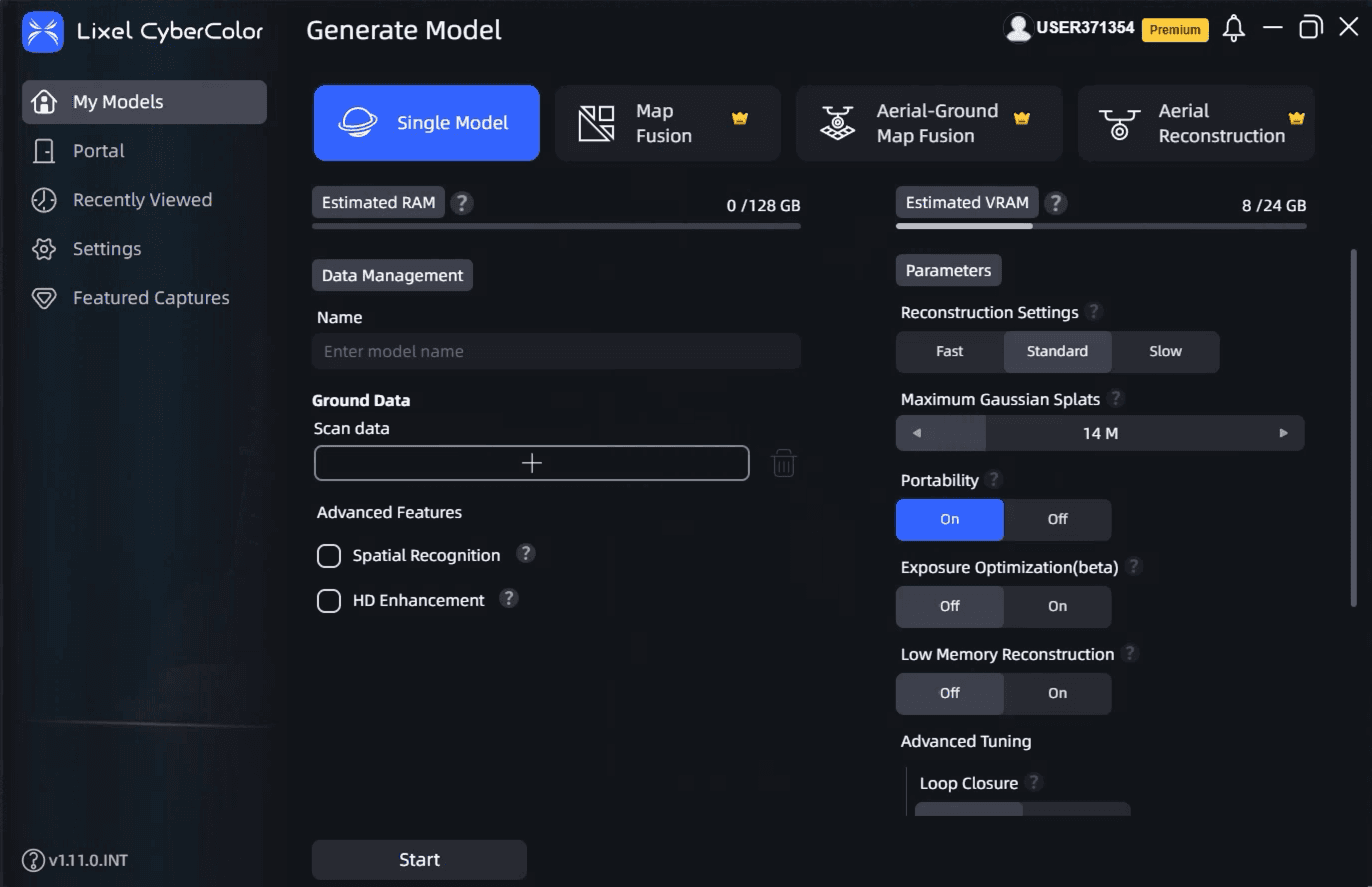
You can turn any Gaussian splat in Splat Labs Cloud into a 2D floor plan and keep it locked to your real 3D space with calibration and the in-viewer minimap. For a full walkthrough in motion, start with the video below—then use the steps and screenshots as a checklist. If you want feature-level context first, see our Automatic Floor Plan Generator page (indoor and outdoor styles, upload-your-own, and more).
Watch the full tutorial
Full walkthrough: clip your splat, clean noise, capture a top-down shot, generate a styled floor plan, calibrate it to the scene, and navigate with the minimap.
What you will need
- A Splat Labs Cloud account
- A project with at least one processed Gaussian splat already loaded in the viewer
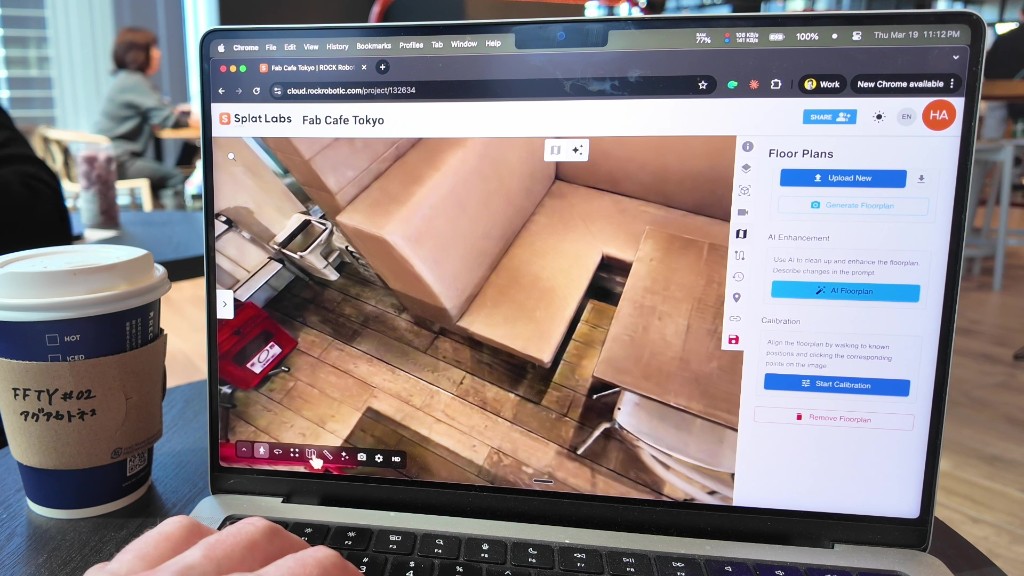
Step 1: Open Floor Plans
Open your project in Splat Labs Cloud. On the right-hand toolbar, click the Floor Plans icon (folded map). That opens the floor plan workflow and side panel options.
![]() Hover or click the Floor Plans tool on the right to start generating or managing floor plans.
Hover or click the Floor Plans tool on the right to start generating or managing floor plans.
Step 2: Clip the roof with the height slider
In Position & Clip, drag the Height (roof) slider until you cut away enough of the top of the splat to see a clear top-down view of the layout you want in the plan. You are not trying to expose every detail at once—you are framing a readable “plan” slice.
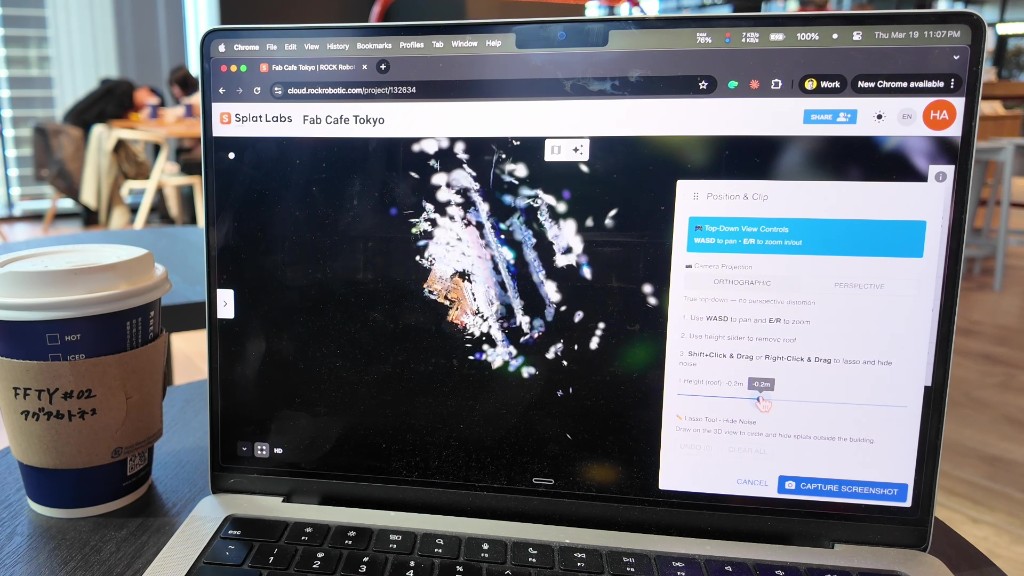 Use Height (roof) to remove ceiling and upper clutter until the floor reads clearly from above.
Step 3: Set the skybox to white (optional but helpful)
For better contrast—and to help the AI read walls and furniture against the background—switch the viewport background from black to white. Open Scene Setup (eye icon on the right toolbar), scroll to Skybox, expand it, set Skybox Type to Solid Color, then pick a light Sky Color (white works well).
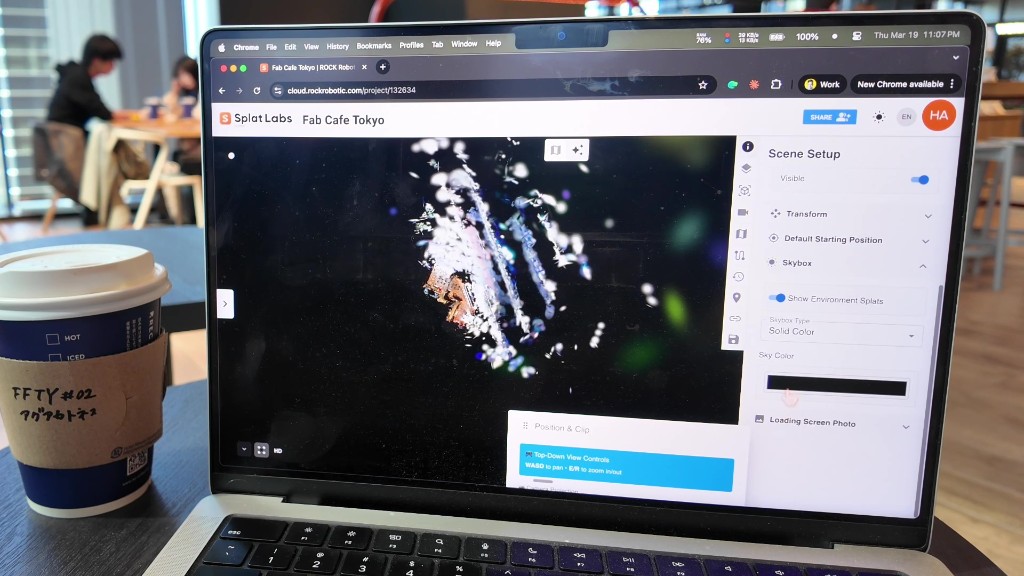 A light skybox improves contrast for both you and the floor plan model.
Step 4: Hide noise with the lasso
Pan and zoom the top-down view so you can tidy the edges of the capture. Hold Shift and click-drag (or right-click-drag) to draw a lasso and hide stray splats outside the building or unwanted blobs. Use UNDO if you remove too much.
Navigation: WASD pans; E and R zoom in and out (see the blue hint in the panel). A practical workflow is to stay zoomed out, clear the big pockets of noise, then zoom in and clean up finer areas.
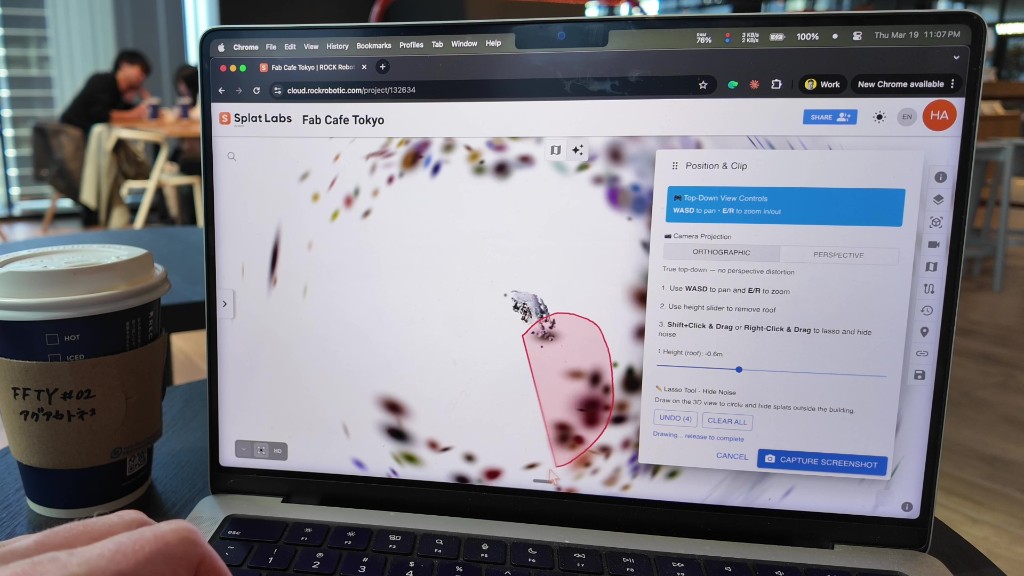 Lasso regions of unwanted splats; they stay hidden for your screenshot.
Step 5: Orthographic view and Capture Screenshot
When the plan is centered and fills the viewport nicely, set Camera Projection to ORTHOGRAPHIC so parallel walls stay parallel—exactly what you want for a floor plan source image. Then click CAPTURE SCREENSHOT.
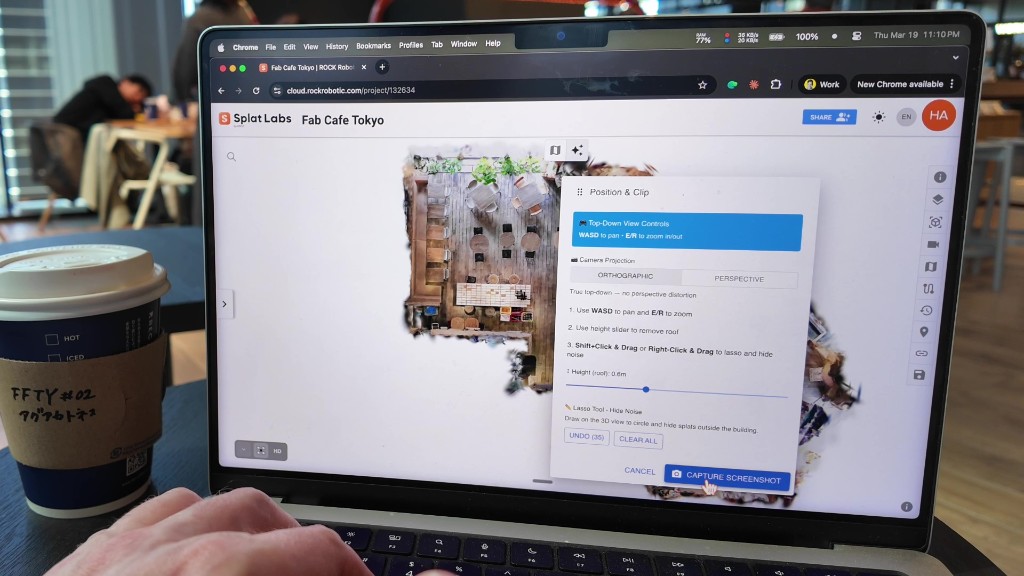 Orthographic + a tight crop gives the generator a clean input image.
Step 6: Choose an indoor style (example: Furnished Floor Plan)
The Generate Floorplan wizard walks through Get Started → Position & Clip → Select Style → Review & Apply. Under Indoor, pick a style that matches your deliverable—for a cafe or retail space with furniture shown as icons, Furnished Floor Plan is a strong default. Enable generation when the UI allows (GENERATE).
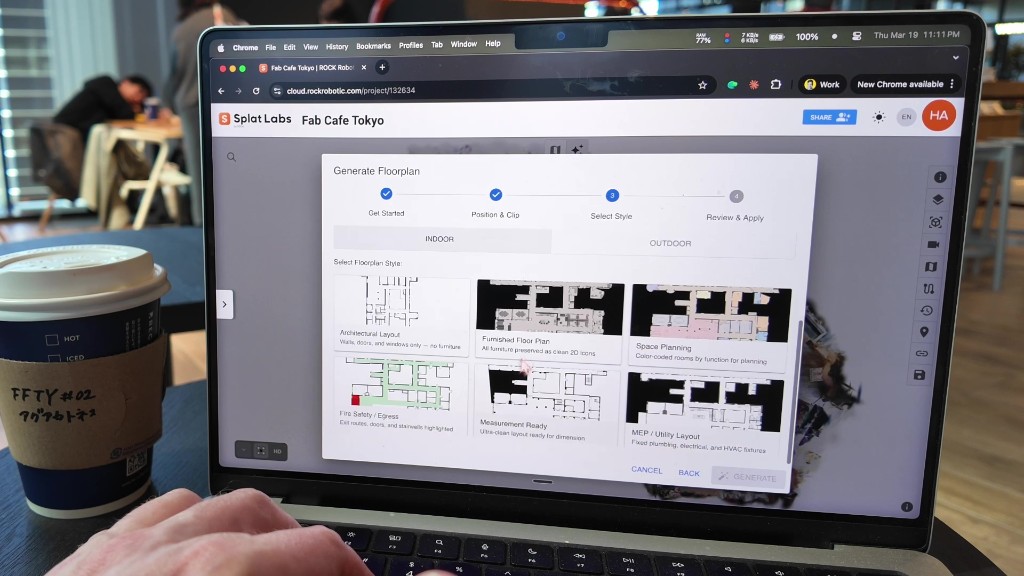 Pick an indoor style; furnished plans keep furniture as clean 2D symbols.
Step 7: Review and use the floor plan
On Review & Apply, inspect the result. You can try alternate styles from the chips under “Not quite right?” When you are happy, click USE THIS FLOORPLAN to attach it to the project.
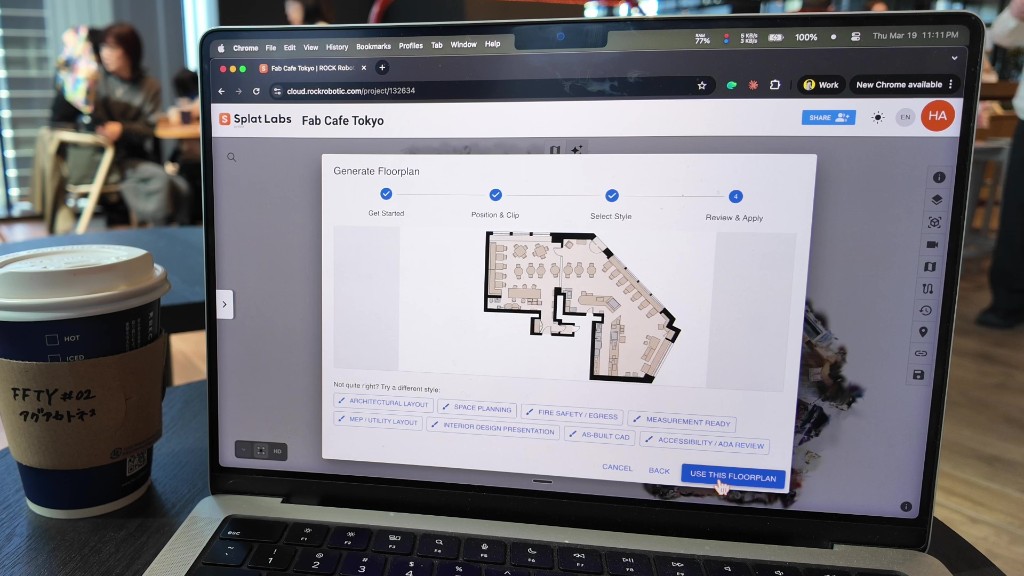 Confirm the layout, then USE THIS FLOORPLAN to save it to the project.
Step 8: Start calibration
In the Floor Plans sidebar, open Calibration and click Start Calibration. You will align the 2D image to the real 3D coordinates of your splat.
 Start Calibration begins picking correspondences between the scene and the plan.
Step 9: Add calibration points
Walk to a spot you recognize—corners, doorways, and distinct furniture work well. Then click the matching point on the 2D floor plan. The tool needs at least three pairs; four or five usually gives a tighter scale and rotation. Repeat until you have solid coverage around the space.
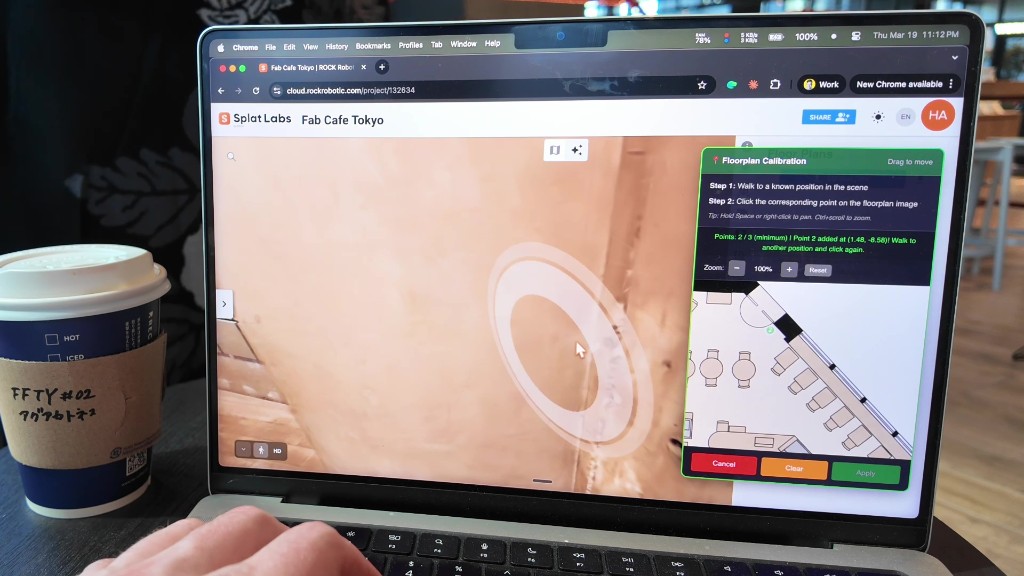 Move in 3D, then click where you are standing on the 2D plan.
Step 10: Apply calibration
When enough points are placed, click Apply. That locks scale and orientation of the plan to your splat so the minimap matches how you move through the model.
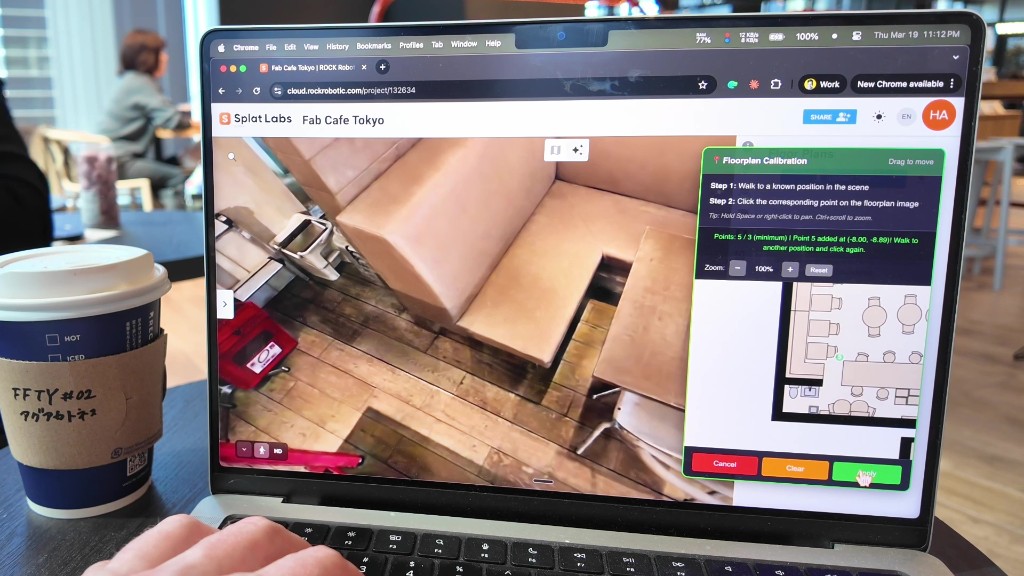 Apply commits the transform so the overlay tracks the scene.
Step 11: Open the minimap
Use the lower-left expand control on the viewer chrome, then click the minimap (map) icon. The calibrated floor plan appears as an overlay while you navigate.
 Expand the bottom toolbar and enable the minimap.
Step 12: Navigate with the plan
Move through the space: the minimap should rotate and track with you so your position and heading match the 2D layout. That is the payoff of calibration—a plan that behaves like a real mini map, not a floating image.
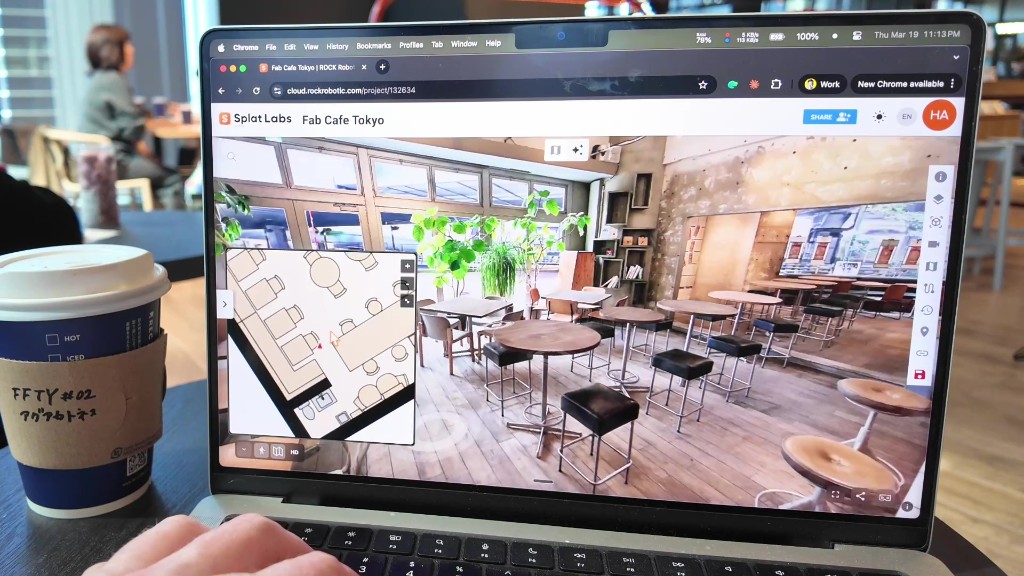 Calibrated minimap stays aligned while you explore.
Bring your own floor plan
You are not limited to AI-generated plans. If you already have a PDF, DWG export, or raster image, use Upload New in the Floor Plans panel to bring your own artwork—then run Calibration the same way to pin it to the splat.
Next steps
- Try different indoor styles for the same screenshot when stakeholders need multiple deliverables.
- Pair a polished plan with measurements and sharing when you publish the project to clients.
If you have questions about enterprise deployment or batch workflows, reach out through the main site—we are happy to help.